Random wanderings through Microsoft Azure esp. the IoT bits, AI on Micro controllers, .NET nanoFramework, .NET Core on *nix, and GHI Electronics TinyCLR
The Myriota Connector only supports Direct Methods which provide immediate confirmation of the result being queued by the Myriota Cloud API. The Myriota (API) control message send method responds with 400 Bad Request if there is already a message being sent to a device.
Myriota Azure Function Environment Variable configuration
Sense and Locate Azure IoT Central Template Fan Speed Enumeration
The fan speed value in the message payload is configured in the fan speed enumeration.
Sense and Locate Azure IoT Central Command Fan Speed Selection
The FanSpeed.cs payload formatter extracts the FanSpeed value from the Javascript Object Notation(JSON) payload and returns a two-byte array containing the message type and speed of the fan.
using System;
using System.Collections.Generic;

using Newtonsoft.Json;
using Newtonsoft.Json.Linq;

public class FormatterDownlink : PayloadFormatter.IFormatterDownlink
{
   public byte[] Evaluate(string terminalId, string methodName, JObject payloadJson, byte[] payloadBytes)
   {
      byte? status = payloadJson.Value<byte?>("FanSpeed");

      if (!status.HasValue)
      {
         return new byte[] { };
      }

      return new byte[] { 1, status.Value };
   }
}
Sense and Locate Azure IoT Central Command Fan Speed History
Each Azure Application Insights log entry starts with the TerminalID (to simplify searching for all the messages related to device) and the requestId a Globally Unique Identifier (GUID) to simplify searching for all the “steps” associated with sending/receiving a message) with the rest of the logging message containing “step” specific diagnostic information.
Sense and Locate Azure IoT Central Command Fan Speed Application Insights
In the Myriota Device Manager the status of Control Messages can be tracked and they can be cancelled if in the “pending” state.
Myriota Control Message status Pending
A Control Message can take up to 24hrs to be delivered and confirmation of delivery has to be implemented by the application developer.
Confirming the number of classes and splits of the training dataset
Selecting the output model architecture (YoloV8s).
Configuring the number of epochs and payment method
Preparing the cloud instance(s) for training
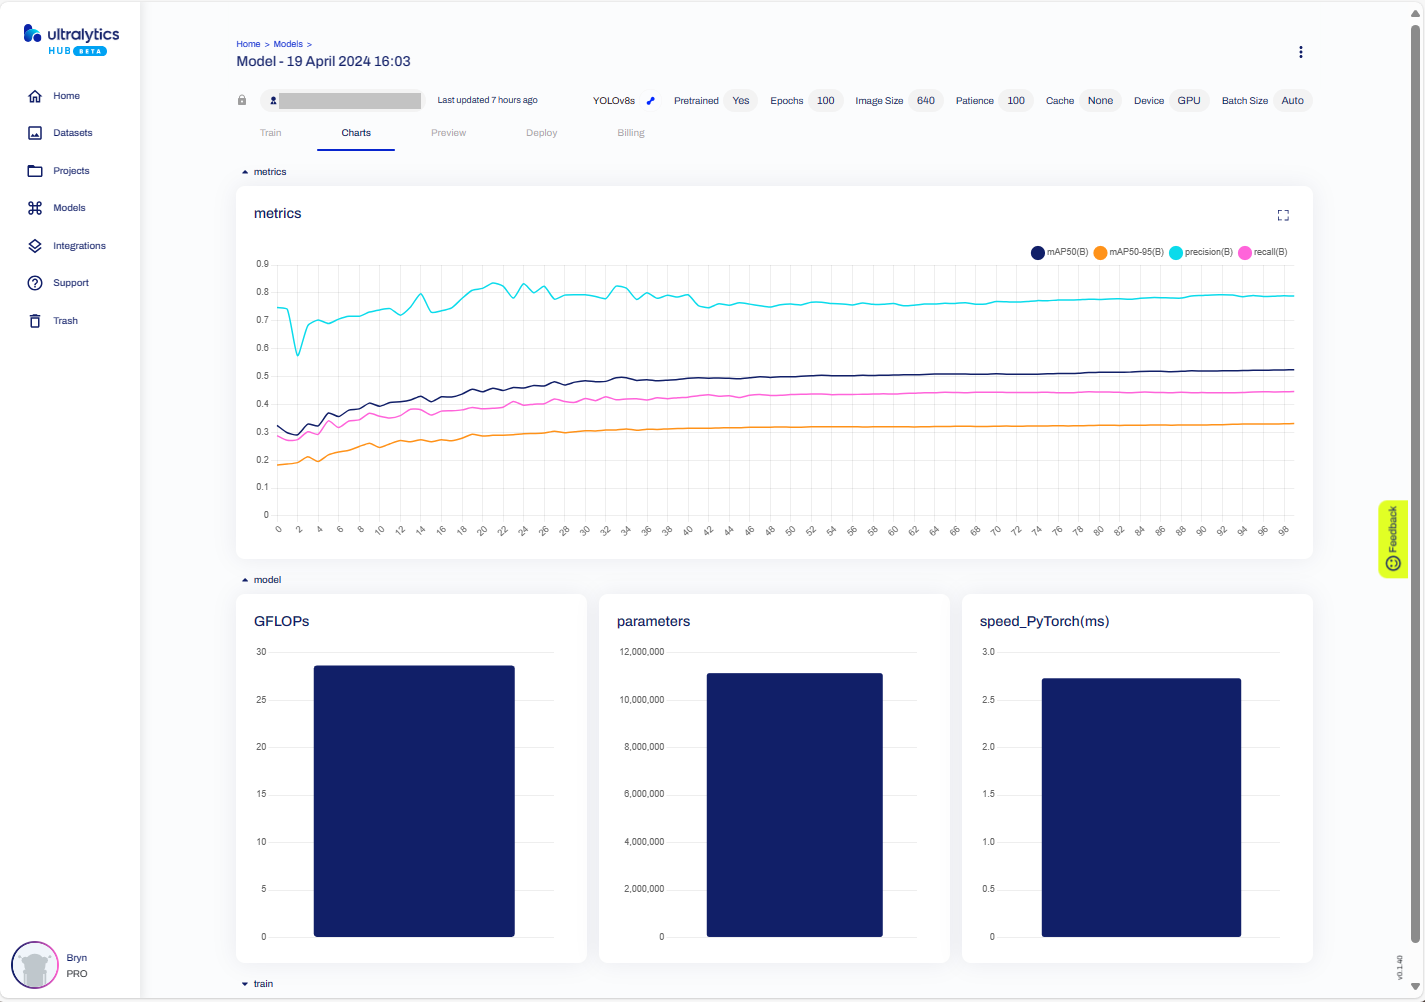
The midpoint of the training process
The training process completed with some basic model metrics.
The resources used and model accuracy metrics.
Model training metrics.
Testing the trained model inference results with my test image.
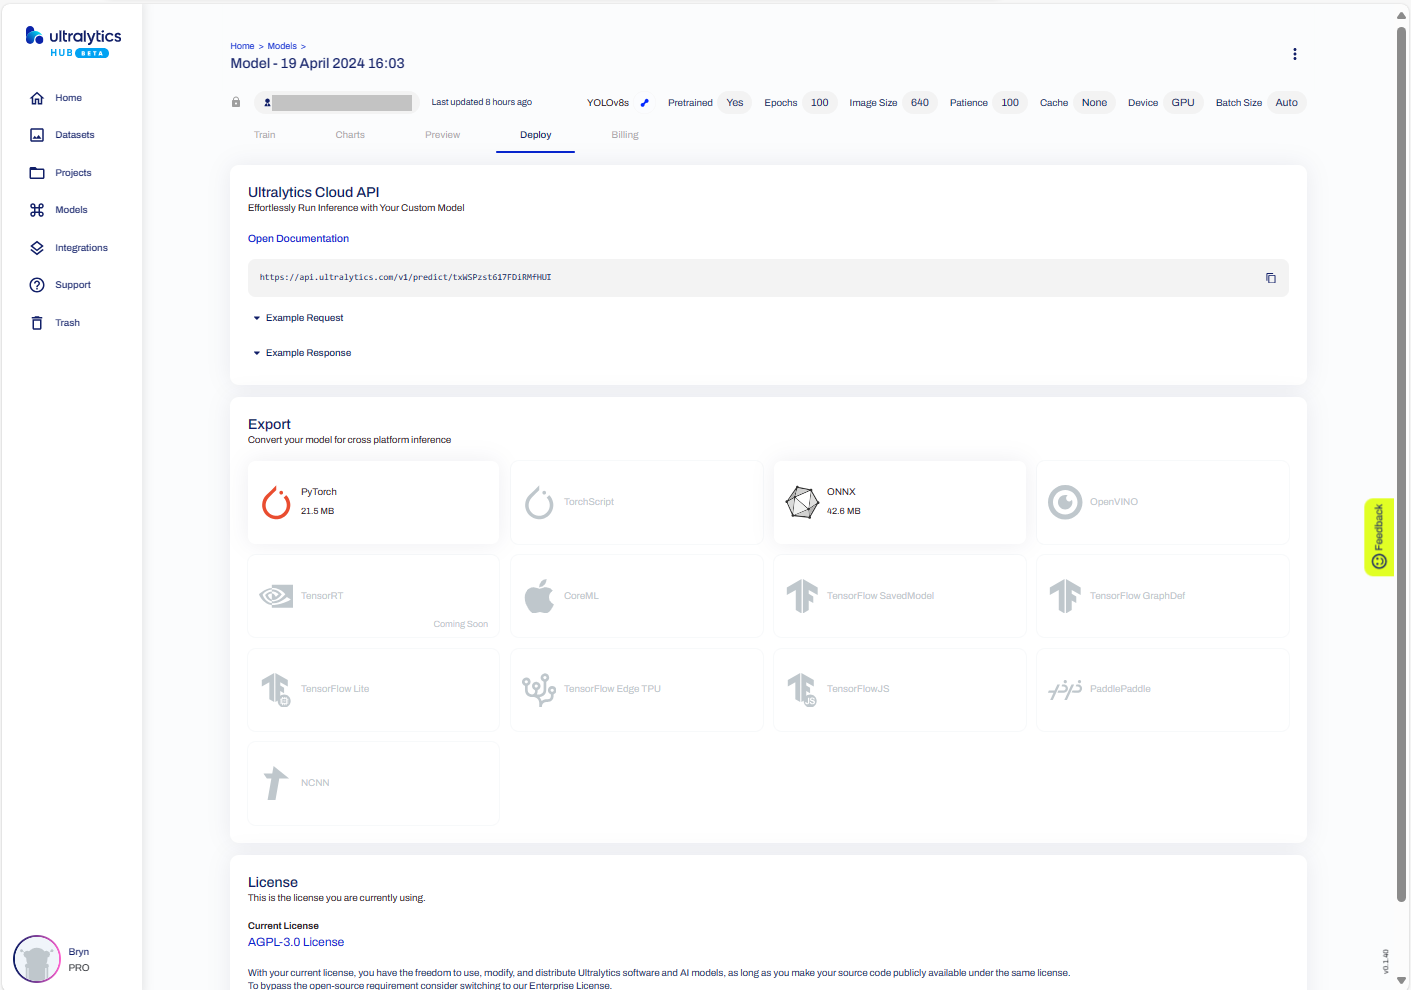
Exporting the trained YoloV8 model in ONNX format.
The duration and cost of training the model.
Testing the YoloV8 model with the dem-compunet.Image console application
Marked-up image generated by the dem-compunet.Image console application.
In this post I have not covered YoloV8 model selection and tuning of the training configuration to optimise the “performance” of the model. I used the default settings and then ran the model training overnight which cost USD6.77
This post is not about how create a “good” model it is the approach I took to create a “proof of concept” model for a demonstration.
To comply with the Ultralytics AGPL-3.0 License and to use an Ultralytics Pro plan the source code and models for an application have to be open source. Rather than publishing my YoloV8 model (which is quite large) this is the first in a series of posts which detail the process I used to create it. (which I think is more useful)
The single test image (not a good idea) is a photograph of 30 tennis balls on my living room floor.
Test image of 30 tennis balls on my living room floor
The object detection results using the “default” model were pretty bad, but this wasn’t a surprise as the model is not optimised for this sort of problem.
roboflow universe open-source model dataset search
I have used datasets from roboflow universe which is a great resource for building “proof of concept” applications.
roboflow universe dataset search
The first step was to identify some datasets which would improve my tennis ball object detection model results. After some searching (with tennis, tennis-ball etc. classes) and filtering (object detection, has a model for faster evaluation, more the 5000 images) to reduce the search results to a manageable number, I identified 5 datasets worth further evaluation.
In my scenario the performance of the Acebot by Mrunal model was worse than the “default” yolov8s model.
In my scenario the performance of the tennis racket by test model was similar to the “default” yolov8s model.
In my scenario the performance of the Tennis Ball by Hust model was a bit better than the “default” yolov8s mode
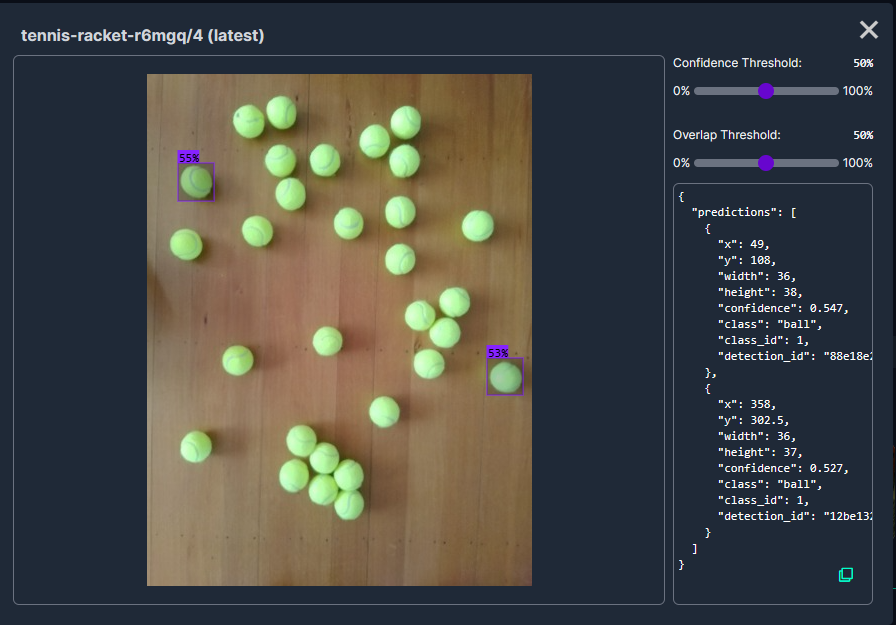
In my scenario the performance of the roboflow_oball by ahmedelshalkany model was pretty good it detected 28 of the 30 tennis balls.
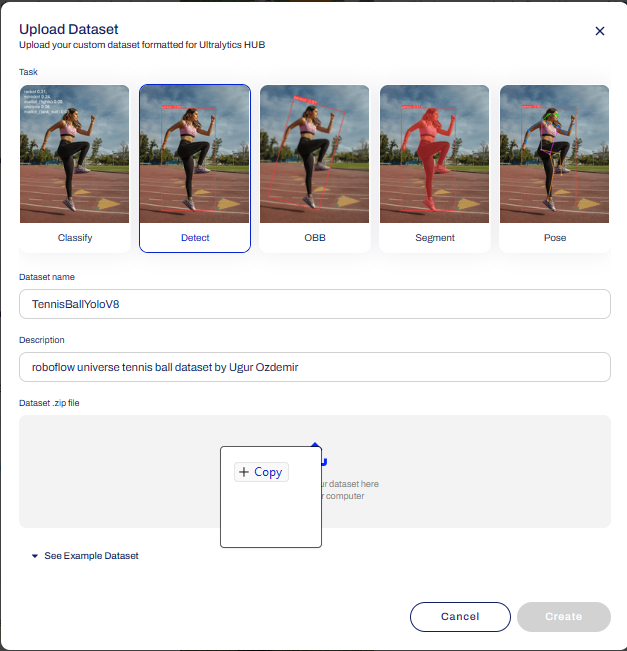
In my scenario the performance of the Tennis Ball by Ugur Ozdemir model was good it detected all of the 30 tennis balls.
As part of some scale testing of my WebAPIDapper and WebMinimalAPIDapper i have been “cleaning up” a portion of the Inside AirbnbLondon dataset. To make the scale testing results more realistic I wanted at least one table with lots of rows.
CREATE TABLE [dbo].[CalendarRawDetailed](
	[listing_id] [bigint] NOT NULL,
	[Date] [date] NOT NULL,
	[Xavailable] [bit] NULL,
	[available] [nvarchar](5) NOT NULL,
	[Xprice] [money] NULL,
	[price] [nvarchar](30) NOT NULL,
	[Xadjusted_price] [money] NULL,
	[adjusted_price] [nvarchar](30) NOT NULL,
	[Xminimum_nights] [smallint] NULL,
	[minimum_nights] [nvarchar](30) NOT NULL,
	[Xmaximum_nights] [smallint] NULL,
	[maximum_nights] [nvarchar](30) NOT NULL
) ON [PRIMARY]
The CalendarRawDetailed had some invalid values which were most probably due formatting inconsistencies on the AirBnb website
SELECT COUNT(*) FROM CalendarRawDetailed WHERE Xminimum_nights IS NULL
SELECT * FROM CalendarRawDetailed WHERE Xminimum_nights IS NULL

SELECT COUNT(*) FROM CalendarRawDetailed WHERE Xmaximum_nights IS NULL
SELECT * FROM CalendarRawDetailed WHERE Xmaximum_nights IS NULL

SELECT COUNT(*) FROM CalendarRawDetailed WHERE Xadjusted_price IS NULL
SELECT * FROM CalendarRawDetailed WHERE Xadjusted_price IS NULL

SELECT COUNT(*) FROM CalendarRawDetailed WHERE Xprice IS NULL
SELECT * FROM CalendarRawDetailed WHERE Xprice IS NULL
Where possible I recovered the values with an “incorrect” format, but some rows had to be deleted.
UPDATE CalendarRawDetailed SET Xmaximum_nights =  TRY_CONVERT(smallint,  RTRIM(maximum_nights, '"')) WHERE Xmaximum_nights IS NULL

UPDATE CalendarRawDetailed SET XmINimum_nights =  TRY_CONVERT(smallint,  RTRIM(mINimum_nights, '"')) WHERE Xminimum_nights IS NULL

UPDATE CalendarRawDetailed SET Xadjusted_price =  TRY_CONVERT(money,  LTRIM(adjusted_price, '$')) --WHERE Xmaximum_nights IS NULL

SELECT *
FROM CalendarRawDetailed
WHERE Xadjusted_price IS NULL
DELETE FROM CalendarRawDetailed WHERE Xmaximum_nights IS NULL

UPDATE CalendarRawDetailed set Xavailable = 1 where available = 't'
The Calendar table has 365 rows for each listing, and I will update Calendar dates, so they are in the “future”.
CREATE TABLE [dbo].[Calendar](
   [listing_id] [bigint] NOT NULL,
   [date] [date] NOT NULL,
   [available] [bit] NOT NULL,
   [price] [money] NOT NULL,
   [adjusted_price] [money] NOT NULL,
   [minimum_nights] [smallint] NOT NULL,
   [maximum_nights] [smallint] NOT NULL
) ON [PRIMARY]
The Calendar table as approximately 31 million rows which should be plenty for my scale testing.
The uses the Microsoft.Extensions.Logging library to publish diagnostic information to the console while debugging the application.
Visual Studio 2022 QuickWatch displaying object detection results.
To check the results I put a breakpoint in the timer just after DetectAsync method is called and then used the Visual Studio 2022 Debugger QuickWatch functionality to inspect the contents of the DetectionResult object.
Visual Studio 2022 JSON Visualiser displaying object detection results.
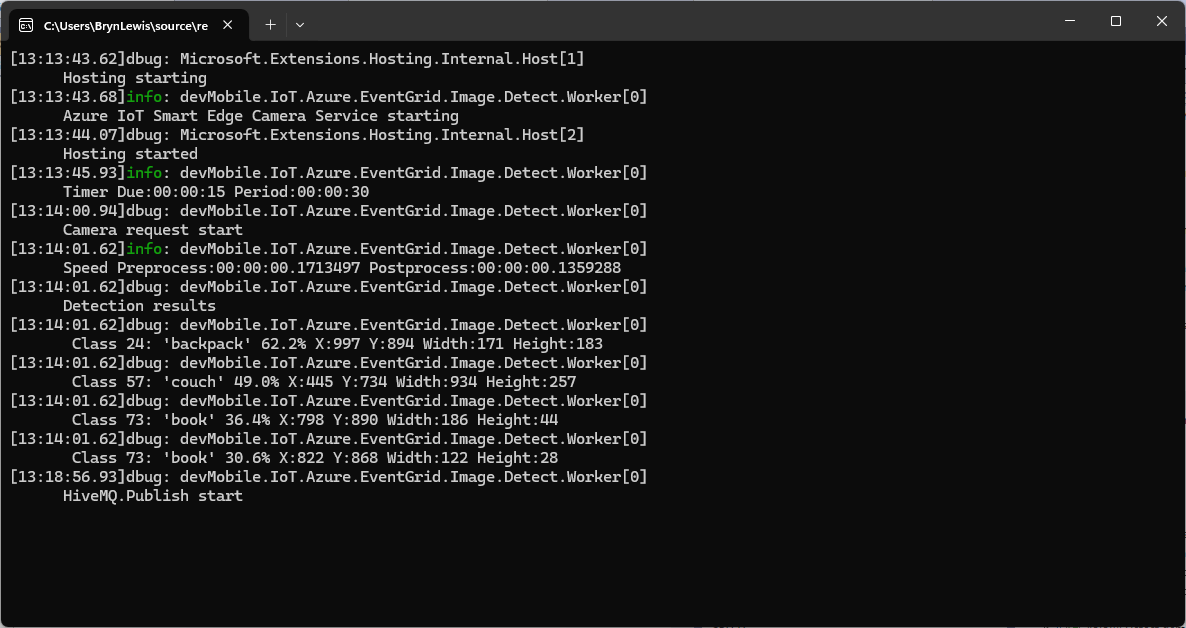
Security Camera image for object detection photo bombed by Yarnold our Standard Apricot Poodle.
This application can also be deployed as a Linuxsystemd Service so it will start then run in the background. The same approach as the YoloV8.Detect.SecurityCamera.Stream sample is used because the image doesn’t have to be saved on the local filesystem.
The YoloV8.Detect.SecurityCamera.File sample downloads images from the security camera to the local file system, then calls DetectAsync with the local file path.
private static async void ImageUpdateTimerCallback(object state)
{
   //...
   try
   {
      Console.WriteLine($"{DateTime.UtcNow:yy-MM-dd HH:mm:ss:fff} YoloV8 Security Camera Image File processing start");

      using (Stream cameraStream = await _httpClient.GetStreamAsync(_applicationSettings.CameraUrl))
      using (Stream fileStream = System.IO.File.Create(_applicationSettings.ImageFilepath))
      {
         await cameraStream.CopyToAsync(fileStream);
      }

      DetectionResult result = await _predictor.DetectAsync(_applicationSettings.ImageFilepath);

      Console.WriteLine($"Speed: {result.Speed}");

      foreach (var prediction in result.Boxes)
      {
         Console.WriteLine($" Class {prediction.Class} {(prediction.Confidence * 100.0):f1}% X:{prediction.Bounds.X} Y:{prediction.Bounds.Y} Width:{prediction.Bounds.Width} Height:{prediction.Bounds.Height}");
      }

      Console.WriteLine($"{DateTime.UtcNow:yy-MM-dd HH:mm:ss:fff} YoloV8 Security Camera Image processing done");
   }
   catch (Exception ex)
   {
      Console.WriteLine($"{DateTime.UtcNow:yy-MM-dd HH:mm:ss} YoloV8 Security camera image download or YoloV8 prediction failed {ex.Message}");
   }
//...
}
Console application using camera image saved on filesystem
The ImageSelector parameter of DetectAsync caught my attention as I hadn’t seen this approach use before. The developers who wrote the NuGet package are definitely smarter than me so I figured I might learn something useful digging deeper.
public static DetectionResult Detect(this YoloV8 predictor, ImageSelector selector)
{
    predictor.ValidateTask(YoloV8Task.Detect);

    return predictor.Run(selector, (outputs, image, timer) =>
    {
        var output = outputs[0].AsTensor<float>();

        var parser = new DetectionOutputParser(predictor.Metadata, predictor.Parameters);

        var boxes = parser.Parse(output, image);
        var speed = timer.Stop();

        return new DetectionResult
        {
            Boxes = boxes,
            Image = image,
            Speed = speed,
        };
    });

    public TResult Run<TResult>(ImageSelector selector, PostprocessContext<TResult> postprocess) where TResult : YoloV8Result
    {
        using var image = selector.Load(true);

        var originSize = image.Size;

        var timer = new SpeedTimer();

        timer.StartPreprocess();

        var input = Preprocess(image);

        var inputs = MapNamedOnnxValues([input]);

        timer.StartInference();

        using var outputs = Infer(inputs);

        var list = new List<NamedOnnxValue>(outputs);

        timer.StartPostprocess();

        return postprocess(list, originSize, timer);
    }
}
It looks like most of the image loading magic of ImageSelector class is implemented using the SixLabors library…
public class ImageSelector<TPixel> where TPixel : unmanaged, IPixel<TPixel>
{
    private readonly Func<Image<TPixel>> _factory;

    public ImageSelector(Image image)
    {
        _factory = image.CloneAs<TPixel>;
    }

    public ImageSelector(string path)
    {
        _factory = () => Image.Load<TPixel>(path);
    }

    public ImageSelector(byte[] data)
    {
        _factory = () => Image.Load<TPixel>(data);
    }

    public ImageSelector(Stream stream)
    {
        _factory = () => Image.Load<TPixel>(stream);
    }

    internal Image<TPixel> Load(bool autoOrient)
    {
        var image = _factory();

        if (autoOrient)
            image.Mutate(x => x.AutoOrient());

        return image;
    }

    public static implicit operator ImageSelector<TPixel>(Image image) => new(image);
    public static implicit operator ImageSelector<TPixel>(string path) => new(path);
    public static implicit operator ImageSelector<TPixel>(byte[] data) => new(data);
    public static implicit operator ImageSelector<TPixel>(Stream stream) => new(stream);
}
Learnt something new must be careful to apply it only where it adds value.
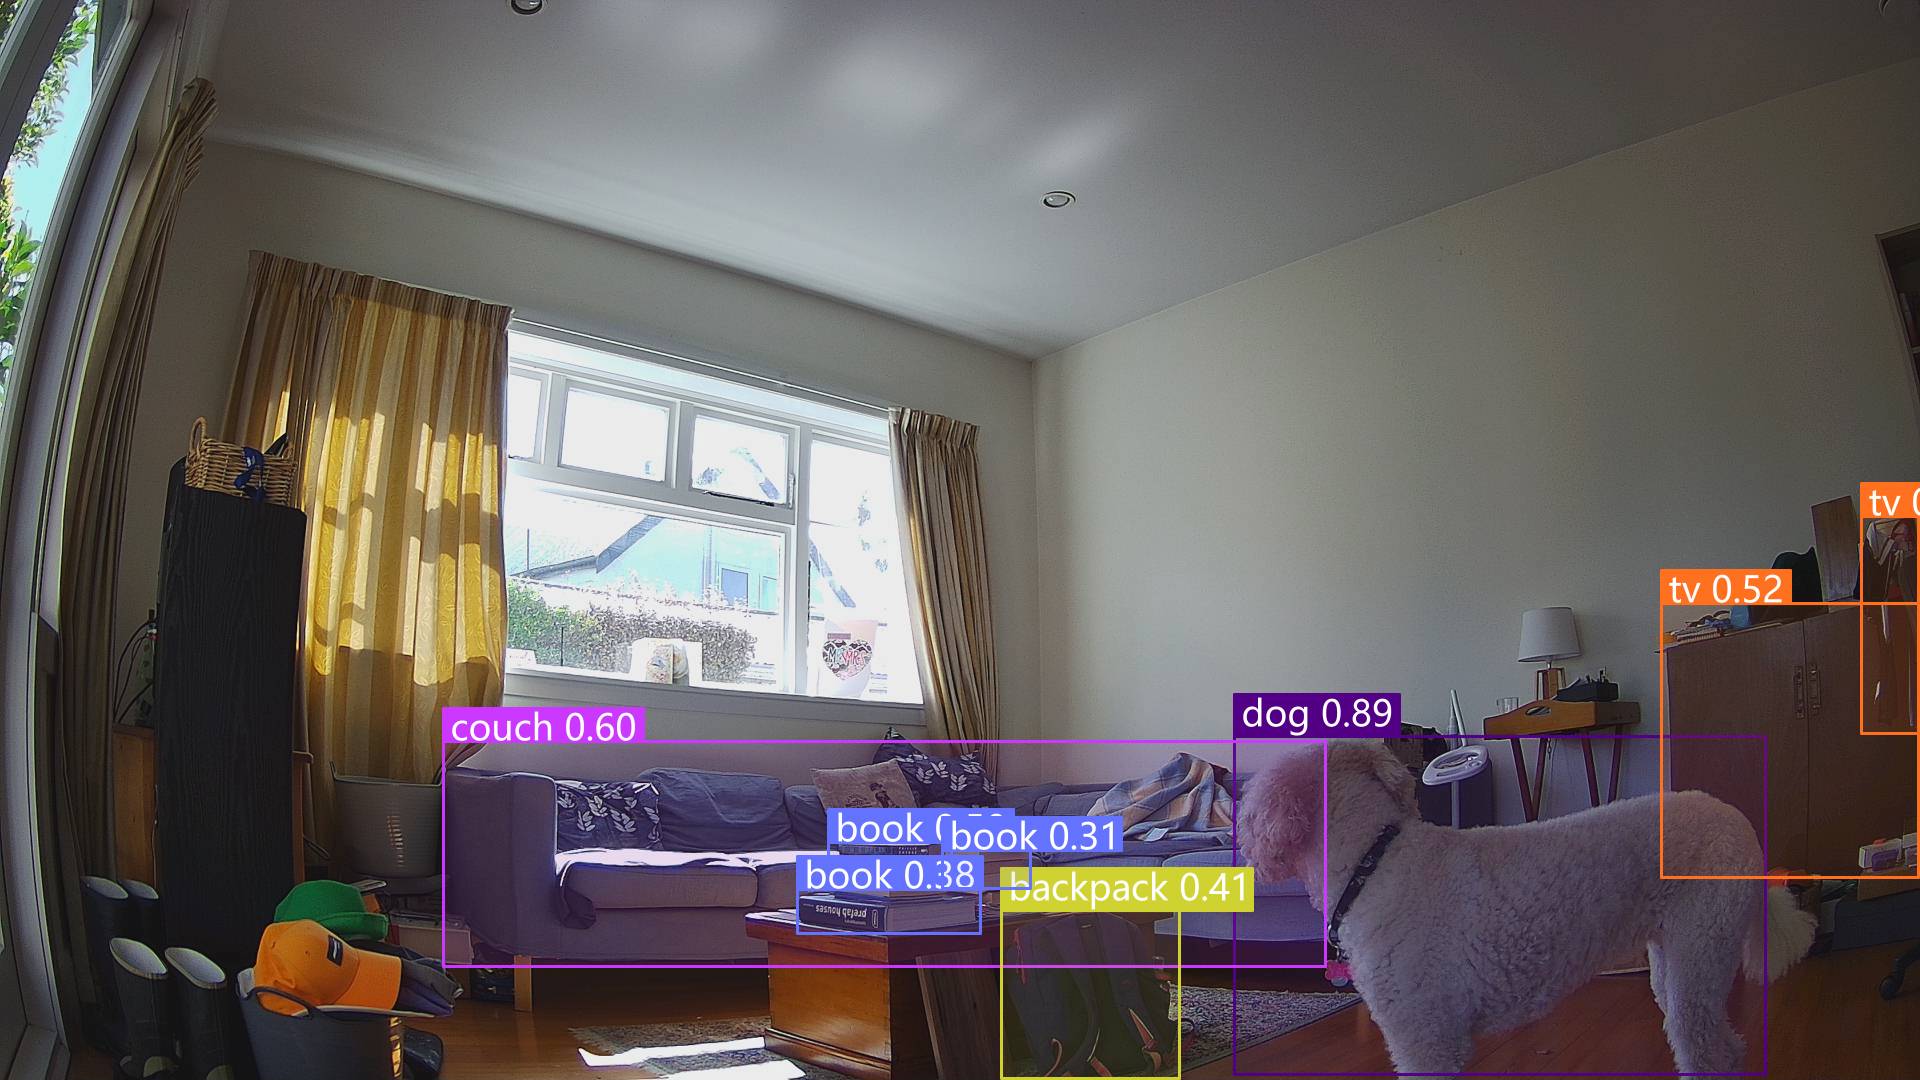
All of the implementations load the model, load the sample image, detect objects in the image, then markup the image with the classification, minimum bounding boxes, and confidences of each object.
Input Image
The first implementation uses YoloV8 by dme-compunet which supports asynchronous operation. The image is loaded asynchronously, the prediction is asynchronous, then marked up and saved asynchronously.
using (var predictor = new Compunet.YoloV8.YoloV8(_applicationSettings.ModelPath))
{
   Console.WriteLine($" {DateTime.UtcNow:yy-MM-dd HH:mm:ss.fff} YoloV8 Model load done");
   Console.WriteLine();

   using (var image = await SixLabors.ImageSharp.Image.LoadAsync<Rgba32>(_applicationSettings.ImageInputPath))
   {
      Console.WriteLine($" {DateTime.UtcNow:yy-MM-dd HH:mm:ss.fff} YoloV8 Model detect start");

      var predictions = await predictor.DetectAsync(image);

      Console.WriteLine($" {DateTime.UtcNow:yy-MM-dd HH:mm:ss.fff} YoloV8 Model detect done");
      Console.WriteLine();

      Console.WriteLine($" Speed: {predictions.Speed}");

      foreach (var prediction in predictions.Boxes)
      {
         Console.WriteLine($"  Class {prediction.Class} {(prediction.Confidence * 100.0):f1}% X:{prediction.Bounds.X} Y:{prediction.Bounds.Y} Width:{prediction.Bounds.Width} Height:{prediction.Bounds.Height}");
      }
      Console.WriteLine();

      Console.WriteLine($" {DateTime.UtcNow:yy-MM-dd HH:mm:ss.fff} Plot and save : {_applicationSettings.ImageOutputPath}");

      SixLabors.ImageSharp.Image imageOutput = await predictions.PlotImageAsync(image);

      await imageOutput.SaveAsJpegAsync(_applicationSettings.ImageOutputPath);
   }
}
dme-compunet YoloV8 test application output
The second implementation uses YoloDotNet by NichSwardh which partially supports asynchronous operation. The image is loaded asynchronously, the prediction is synchronous, the markup is synchronous, and then saved asynchronously.
using (var predictor = new Yolo(_applicationSettings.ModelPath, false))
{
   Console.WriteLine($" {DateTime.UtcNow:yy-MM-dd HH:mm:ss.fff} YoloV8 Model load done");
   Console.WriteLine();

   using (var image = await SixLabors.ImageSharp.Image.LoadAsync<Rgba32>(_applicationSettings.ImageInputPath))
   {
      Console.WriteLine($" {DateTime.UtcNow:yy-MM-dd HH:mm:ss.fff} YoloV8 Model detect start");

      var predictions = predictor.RunObjectDetection(image);

      Console.WriteLine($" {DateTime.UtcNow:yy-MM-dd HH:mm:ss.fff} YoloV8 Model detect done");
      Console.WriteLine();

      foreach (var predicition in predictions)
      {
         Console.WriteLine($"  Class {predicition.Label.Name} {(predicition.Confidence * 100.0):f1}% X:{predicition.BoundingBox.Left} Y:{predicition.BoundingBox.Y} Width:{predicition.BoundingBox.Width} Height:{predicition.BoundingBox.Height}");
      }
      Console.WriteLine();

      Console.WriteLine($" {DateTime.UtcNow:yy-MM-dd HH:mm:ss.fff} Plot and save : {_applicationSettings.ImageOutputPath}");

      image.Draw(predictions);

      await image.SaveAsJpegAsync(_applicationSettings.ImageOutputPath);
   }
}
nickswardth YoloDotNet test application output
The third implementation uses YoloV8 by sstainba which partially supports asynchronous operation. The image is loaded asynchronously, the prediction is synchronous, the markup is synchronous, and then saved asynchronously.
using (var predictor = YoloV8Predictor.Create(_applicationSettings.ModelPath))
{
   Console.WriteLine($" {DateTime.UtcNow:yy-MM-dd HH:mm:ss.fff} YoloV8 Model load done");
   Console.WriteLine();

   using (var image = await SixLabors.ImageSharp.Image.LoadAsync<Rgba32>(_applicationSettings.ImageInputPath))
   {
      Console.WriteLine($" {DateTime.UtcNow:yy-MM-dd HH:mm:ss.fff} YoloV8 Model detect start");

      var predictions = predictor.Predict(image);

      Console.WriteLine($" {DateTime.UtcNow:yy-MM-dd HH:mm:ss.fff} YoloV8 Model detect done");
      Console.WriteLine();

      foreach (var prediction in predictions)
      {
         Console.WriteLine($"  Class {prediction.Label.Name} {(prediction.Score * 100.0):f1}% X:{prediction.Rectangle.X} Y:{prediction.Rectangle.Y} Width:{prediction.Rectangle.Width} Height:{prediction.Rectangle.Height}");
      }

      Console.WriteLine();

      Console.WriteLine($" {DateTime.UtcNow:yy-MM-dd HH:mm:ss.fff} Plot and save : {_applicationSettings.ImageOutputPath}");

      // This is a bit hacky should be fixed up in future release
      Font font = new Font(SystemFonts.Get(_applicationSettings.FontName), _applicationSettings.FontSize);
      foreach (var prediction in predictions)
      {
         var x = (int)Math.Max(prediction.Rectangle.X, 0);
         var y = (int)Math.Max(prediction.Rectangle.Y, 0);
         var width = (int)Math.Min(image.Width - x, prediction.Rectangle.Width);
         var height = (int)Math.Min(image.Height - y, prediction.Rectangle.Height);

         //Note that the output is already scaled to the original image height and width.

         // Bounding Box Text
         string text = $"{prediction.Label.Name} [{prediction.Score}]";
         var size = TextMeasurer.MeasureSize(text, new TextOptions(font));

         image.Mutate(d => d.Draw(Pens.Solid(Color.Yellow, 2), new Rectangle(x, y, width, height)));

         image.Mutate(d => d.DrawText(text, font, Color.Yellow, new Point(x, (int)(y - size.Height - 1))));
      }

      await image.SaveAsJpegAsync(_applicationSettings.ImageOutputPath);
   }
}
sstainba YoloV8 test application output
I don’t understand why the three NuGets produced different results which is worrying.
class Program
{
   private static Model.ApplicationSettings _applicationSettings;
   private static IMqttClient _client;
   private static bool _publisherBusy = false;

   static async Task Main()
   {
      Console.WriteLine($"{DateTime.UtcNow:yy-MM-dd HH:mm:ss} MQTTNet client starting");

      try
      {
         // load the app settings into configuration
         var configuration = new ConfigurationBuilder()
               .AddJsonFile("appsettings.json", false, true)
               .AddUserSecrets<Program>()
         .Build();

         _applicationSettings = configuration.GetSection("ApplicationSettings").Get<Model.ApplicationSettings>();

         var mqttFactory = new MqttFactory();

         using (_client = mqttFactory.CreateMqttClient())
         {
            // Certificate based authentication
            List<X509Certificate2> certificates = new List<X509Certificate2>
            {
               new X509Certificate2(_applicationSettings.ClientCertificateFileName, _applicationSettings.ClientCertificatePassword)
            };

            var tlsOptions = new MqttClientTlsOptionsBuilder()
                  .WithClientCertificates(certificates)
                  .WithSslProtocols(System.Security.Authentication.SslProtocols.Tls12)
                  .UseTls(true)
                  .Build();

            MqttClientOptions mqttClientOptions = new MqttClientOptionsBuilder()
                     .WithClientId(_applicationSettings.ClientId)
                     .WithTcpServer(_applicationSettings.Host, _applicationSettings.Port)
                     .WithCredentials(_applicationSettings.UserName, _applicationSettings.Password)
                     .WithCleanStart(_applicationSettings.CleanStart)
                     .WithTlsOptions(tlsOptions)
                     .Build();

            var connectResult = await _client.ConnectAsync(mqttClientOptions);
            if (connectResult.ResultCode != MqttClientConnectResultCode.Success)
            {
               throw new Exception($"Failed to connect: {connectResult.ReasonString}");
            }

            _client.ApplicationMessageReceivedAsync += OnApplicationMessageReceivedAsync;

            Console.WriteLine($"Subscribed to Topic");
            foreach (string topic in _applicationSettings.SubscribeTopics.Split(',', StringSplitOptions.RemoveEmptyEntries | StringSplitOptions.TrimEntries))
            {
               var subscribeResult = await _client.SubscribeAsync(topic, _applicationSettings.SubscribeQualityOfService);

               Console.WriteLine($" {topic} Result:{subscribeResult.Items.First().ResultCode}");
            }
      }
//...
}
MQTTnet client console application output
The design of the MQTT protocol means that the hivemq-mqtt-client-dotnet and MQTTnet implementations are similar. Having used both I personally prefer the HiveMQ client library.
For one test deployment it took me an hour to generate the Root, Intermediate and a number of Devices certificates which was a waste of time. At this point I decided investigate writing some applications to simplify the process.
static void Main(string[] args)
{
   var serviceProvider = new ServiceCollection()
         .AddCertificateManager()
         .BuildServiceProvider();

   // load the app settings into configuration
   var configuration = new ConfigurationBuilder()
         .AddJsonFile("appsettings.json", false, true)
         .AddUserSecrets<Program>()
   .Build();

   _applicationSettings = configuration.GetSection("ApplicationSettings").Get<Model.ApplicationSettings>();
//------
   Console.WriteLine($"validFrom:{validFrom} ValidTo:{validTo}");

   var serverRootCertificate = serviceProvider.GetService<CreateCertificatesClientServerAuth>();

   var root = serverRootCertificate.NewRootCertificate(
         new DistinguishedName {
               CommonName = _applicationSettings.CommonName,
               Organisation = _applicationSettings.Organisation,
               OrganisationUnit = _applicationSettings.OrganisationUnit,
               Locality = _applicationSettings.Locality,
               StateProvince  = _applicationSettings.StateProvince,
               Country = _applicationSettings.Country
         },
         new ValidityPeriod {
         ValidFrom = validFrom,
         ValidTo = validTo,
         },
         _applicationSettings.PathLengthConstraint,
         _applicationSettings.DnsName);
   root.FriendlyName = _applicationSettings.FriendlyName;

   Console.Write("PFX Password:");
   string password = Console.ReadLine();
   if ( String.IsNullOrEmpty(password))
   {
      Console.WriteLine("PFX Password invalid");
      return;
   }

   var exportCertificate = serviceProvider.GetService<ImportExportCertificate>();

   var rootCertificatePfxBytes = exportCertificate.ExportRootPfx(password, root);
   File.WriteAllBytes(_applicationSettings.RootCertificateFilePath, rootCertificatePfxBytes);

   Console.WriteLine($"Root certificate file:{_applicationSettings.RootCertificateFilePath}");
   Console.WriteLine("press enter to exit");
   Console.ReadLine();
}
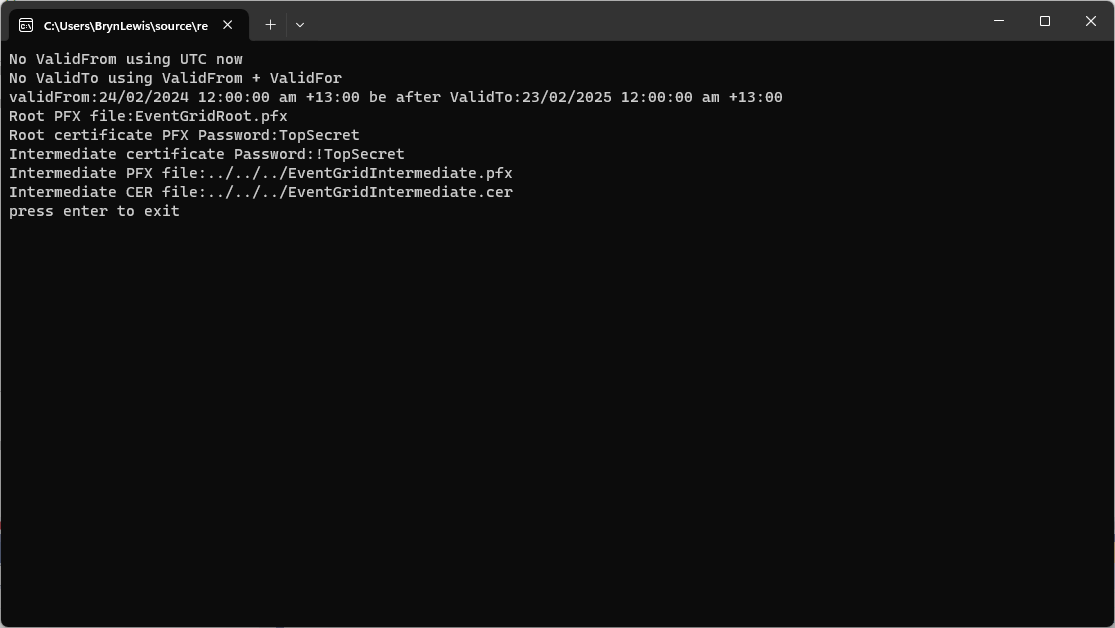
The application’s configuration was split between application settings file(certificate file paths, validity periods, Organisation etc.) or entered at runtime ( certificate filenames, passwords etc.) The first application generates a Root Certificate using the distinguished name information from the application settings, plus file names and passwords entered by the user.
Root Certificate generation application output
The second application generates an Intermediate Certificate using the Root Certificate, the distinguished name information from the application settings, plus file names and passwords entered by the user.
static void Main(string[] args)
{
   var serviceProvider = new ServiceCollection()
         .AddCertificateManager()
         .BuildServiceProvider();

   // load the app settings into configuration
   var configuration = new ConfigurationBuilder()
         .AddJsonFile("appsettings.json", false, true)
         .AddUserSecrets<Program>()
   .Build();

   _applicationSettings = configuration.GetSection("ApplicationSettings").Get<Model.ApplicationSettings>();
//------
   Console.WriteLine($"validFrom:{validFrom} be after ValidTo:{validTo}");

   Console.WriteLine($"Root Certificate file:{_applicationSettings.RootCertificateFilePath}");

   Console.Write("Root Certificate Password:");
   string rootPassword = Console.ReadLine();
   if (String.IsNullOrEmpty(rootPassword))
   {
      Console.WriteLine("Fail");
      return;
   }
   var rootCertificate = new X509Certificate2(_applicationSettings.RootCertificateFilePath, rootPassword);

   var intermediateCertificateCreate = serviceProvider.GetService<CreateCertificatesClientServerAuth>();

   var intermediateCertificate = intermediateCertificateCreate.NewIntermediateChainedCertificate(
         new DistinguishedName
         {
            CommonName = _applicationSettings.CommonName,
            Organisation = _applicationSettings.Organisation,
            OrganisationUnit = _applicationSettings.OrganisationUnit,
            Locality = _applicationSettings.Locality,
            StateProvince = _applicationSettings.StateProvince,
            Country = _applicationSettings.Country
         },
      new ValidityPeriod
      {
         ValidFrom = validFrom,
         ValidTo = validTo,
      },
            _applicationSettings.PathLengthConstraint,
            _applicationSettings.DnsName, rootCertificate);
      intermediateCertificate.FriendlyName = _applicationSettings.FriendlyName;

   Console.Write("Intermediate certificate Password:");
   string intermediatePassword = Console.ReadLine();
   if (String.IsNullOrEmpty(intermediatePassword))
   {
      Console.WriteLine("Fail");
      return;
   }

   var importExportCertificate = serviceProvider.GetService<ImportExportCertificate>();

   Console.WriteLine($"Intermediate PFX file:{_applicationSettings.IntermediateCertificatePfxFilePath}");
   var intermediateCertificatePfxBtyes = importExportCertificate.ExportChainedCertificatePfx(intermediatePassword, intermediateCertificate, rootCertificate);
   File.WriteAllBytes(_applicationSettings.IntermediateCertificatePfxFilePath, intermediateCertificatePfxBtyes);

   Console.WriteLine($"Intermediate CER file:{_applicationSettings.IntermediateCertificateCerFilePath}");
   var intermediateCertificatePemText = importExportCertificate.PemExportPublicKeyCertificate(intermediateCertificate);
   File.WriteAllText(_applicationSettings.IntermediateCertificateCerFilePath, intermediateCertificatePemText);

   Console.WriteLine("press enter to exit");
   Console.ReadLine();
}
Uploading the Intermediate certificate to Azure Event Grid
The third application generates Device Certificates using the Intermediate Certificate, distinguished name information from the application settings, plus device id, file names and passwords entered by the user.
static void Main(string[] args)
{
   var serviceProvider = new ServiceCollection()
         .AddCertificateManager()
         .BuildServiceProvider();

   // load the app settings into configuration
   var configuration = new ConfigurationBuilder()
         .AddJsonFile("appsettings.json", false, true)
         .AddUserSecrets<Program>()
   .Build();

   _applicationSettings = configuration.GetSection("ApplicationSettings").Get<Model.ApplicationSettings>();
//------
   Console.WriteLine($"validFrom:{validFrom} ValidTo:{validTo}");

   Console.WriteLine($"Intermediate PFX file:{_applicationSettings.IntermediateCertificateFilePath}");

   Console.Write("Intermediate PFX Password:");
   string intermediatePassword = Console.ReadLine();
   if (String.IsNullOrEmpty(intermediatePassword))
   {
      Console.WriteLine("Intermediate PFX Password invalid");
      return;
   }
   var intermediate = new X509Certificate2(_applicationSettings.IntermediateCertificateFilePath, intermediatePassword);

   Console.Write("Device ID:");
   string deviceId = Console.ReadLine();
   if (String.IsNullOrEmpty(deviceId))
   {
      Console.WriteLine("Device ID invalid");
      return;
   }

   var createClientServerAuthCerts = serviceProvider.GetService<CreateCertificatesClientServerAuth>();

   var device = createClientServerAuthCerts.NewDeviceChainedCertificate(
         new DistinguishedName
         {
            CommonName = deviceId,
            Organisation = _applicationSettings.Organisation,
            OrganisationUnit = _applicationSettings.OrganisationUnit,
            Locality = _applicationSettings.Locality,
            StateProvince = _applicationSettings.StateProvince,
            Country = _applicationSettings.Country
         },
      new ValidityPeriod
      {
         ValidFrom = validFrom,
         ValidTo = validTo,
      },
      deviceId, intermediate);
   device.FriendlyName = deviceId;

   Console.Write("Device PFX Password:");
   string devicePassword = Console.ReadLine();
   if (String.IsNullOrEmpty(devicePassword))
   {
      Console.WriteLine("Fail");
      return;
   }

   var importExportCertificate = serviceProvider.GetService<ImportExportCertificate>();

   string devicePfxPath = string.Format(_applicationSettings.DeviceCertificatePfxFilePath, deviceId);

   Console.WriteLine($"Device PFX file:{devicePfxPath}");
   var deviceCertificatePath = importExportCertificate.ExportChainedCertificatePfx(devicePassword, device, intermediate);
   File.WriteAllBytes(devicePfxPath,  deviceCertificatePath);

   Console.WriteLine("press enter to exit");
   Console.ReadLine();
}
Device Certificate generation application output
Uploading the Intermediate certificate to Azure Event Grid